Why budget product photos can still convert like crazy
Great Shopify product photos don’t require a $5,000 camera or a rented studio. What they require is clarity, consistency, and context. When shoppers can see your product clearly, understand its size and finish, and imagine it in real life, conversion rates go up. The good news: with a smartphone, a few low-cost tools, and smart AI post-production, you can build a studio-quality workflow that scales.
What makes a "high-converting" product photo?
- Clarity: Sharp, well-lit images that show true color and texture.
- Consistency: Same angles, backgrounds, and lighting across the catalog.
- Context: Lifestyle shots that show scale and use, not just a white background.
- Speed: A workflow you can repeat for every new SKU without burning hours.
If you want to accelerate that last step, try Supra AI Photo Studio: it removes backgrounds, fixes lighting, builds lifestyle scenes, and even generates UGC-style videos and try-on images — directly for your Shopify store. Install the app here: https://apps.shopify.com/supra-ai-photo-studio or learn more on the landing page: https://supra-ai-photo-studio.sktch.io/.
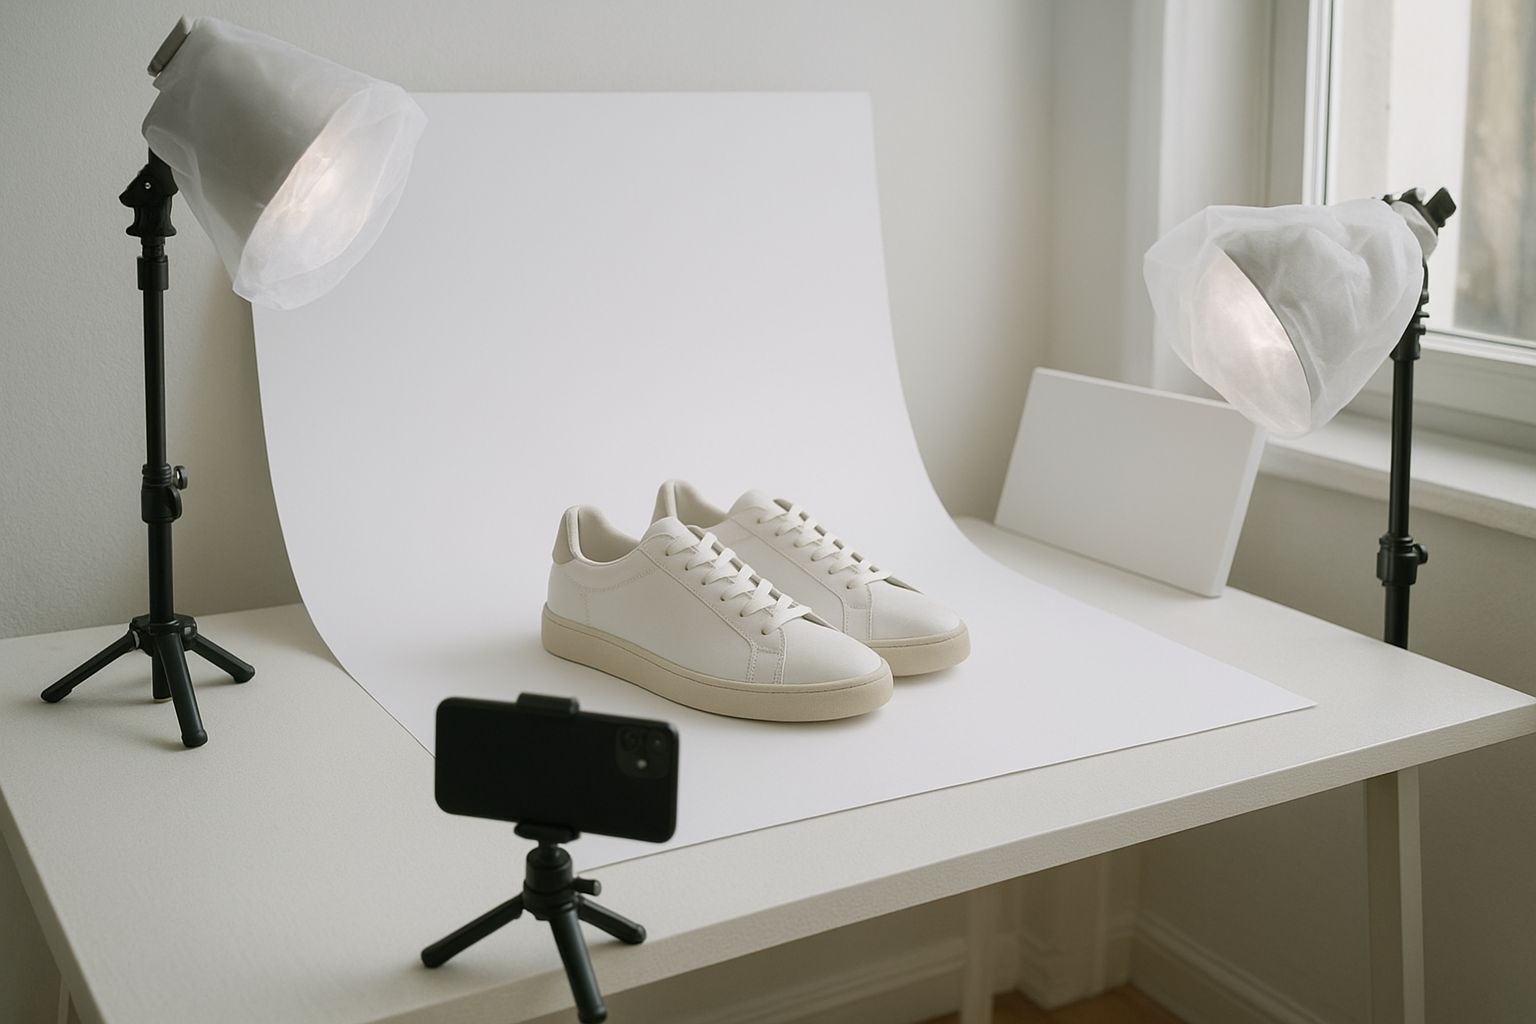
Budget-friendly gear checklist (under $100 to start)
- Smartphone with manual or pro mode
- Small tripod + phone clamp
- Two clamp lights + daylight bulbs (5000–6500K)
- Translucent fabric or baking parchment (DIY diffusion)
- White foam boards (reflectors) + black foam board (for contrast)
- Seamless paper or poster board (your background sweep)
- Microfiber cloth + isopropyl wipes (to clean products)
Optional wins: a lazy Susan/turntable for 360° angles and a light meter app.
Fast lighting setups that look pro
1) Window light hero shot (zero-cost):
- Place your table near a north-facing window.
- Product centered on a white sweep.
- Window at 45° to the product; use a white foam board opposite the window to fill shadows.
- Add a black card behind for a crisp edge if the product is white.
2) Two-light cross with diffusion:
- Clamp lights left and right, slightly above and in front of the product.
- Diffuse both lights with fabric to soften glare.
- Angle one light stronger (key), the other lower power (fill). Use foam board beneath for lift.
Pro tip: Lock white balance to “daylight” and keep ISO low for cleaner images.
A simple shot list that sells
- Hero on white (first image for the product page and feeds)
- 45° angle 3/4 view (shows dimension)
- Back view (essential for apparel and bags)
- Macro detail (stitching, texture, buttons, ports)
- Scale/context (in hand, next to a common object, or lifestyle scene)
- In-use photo (demonstrates key benefit)
- Lifestyle banner (for collection or ads)
Capture settings that reduce retakes
- Clean the product meticulously (dust and fingerprints kill perceived quality)
- Use gridlines; keep horizon and edges straight
- Lock exposure and focus; shoot a small exposure bracket (+/- 0.3 to 0.7)
- Frame with a little extra space to allow cropping consistency later
- Shoot square and 4:5 vertical variants for product pages and ads
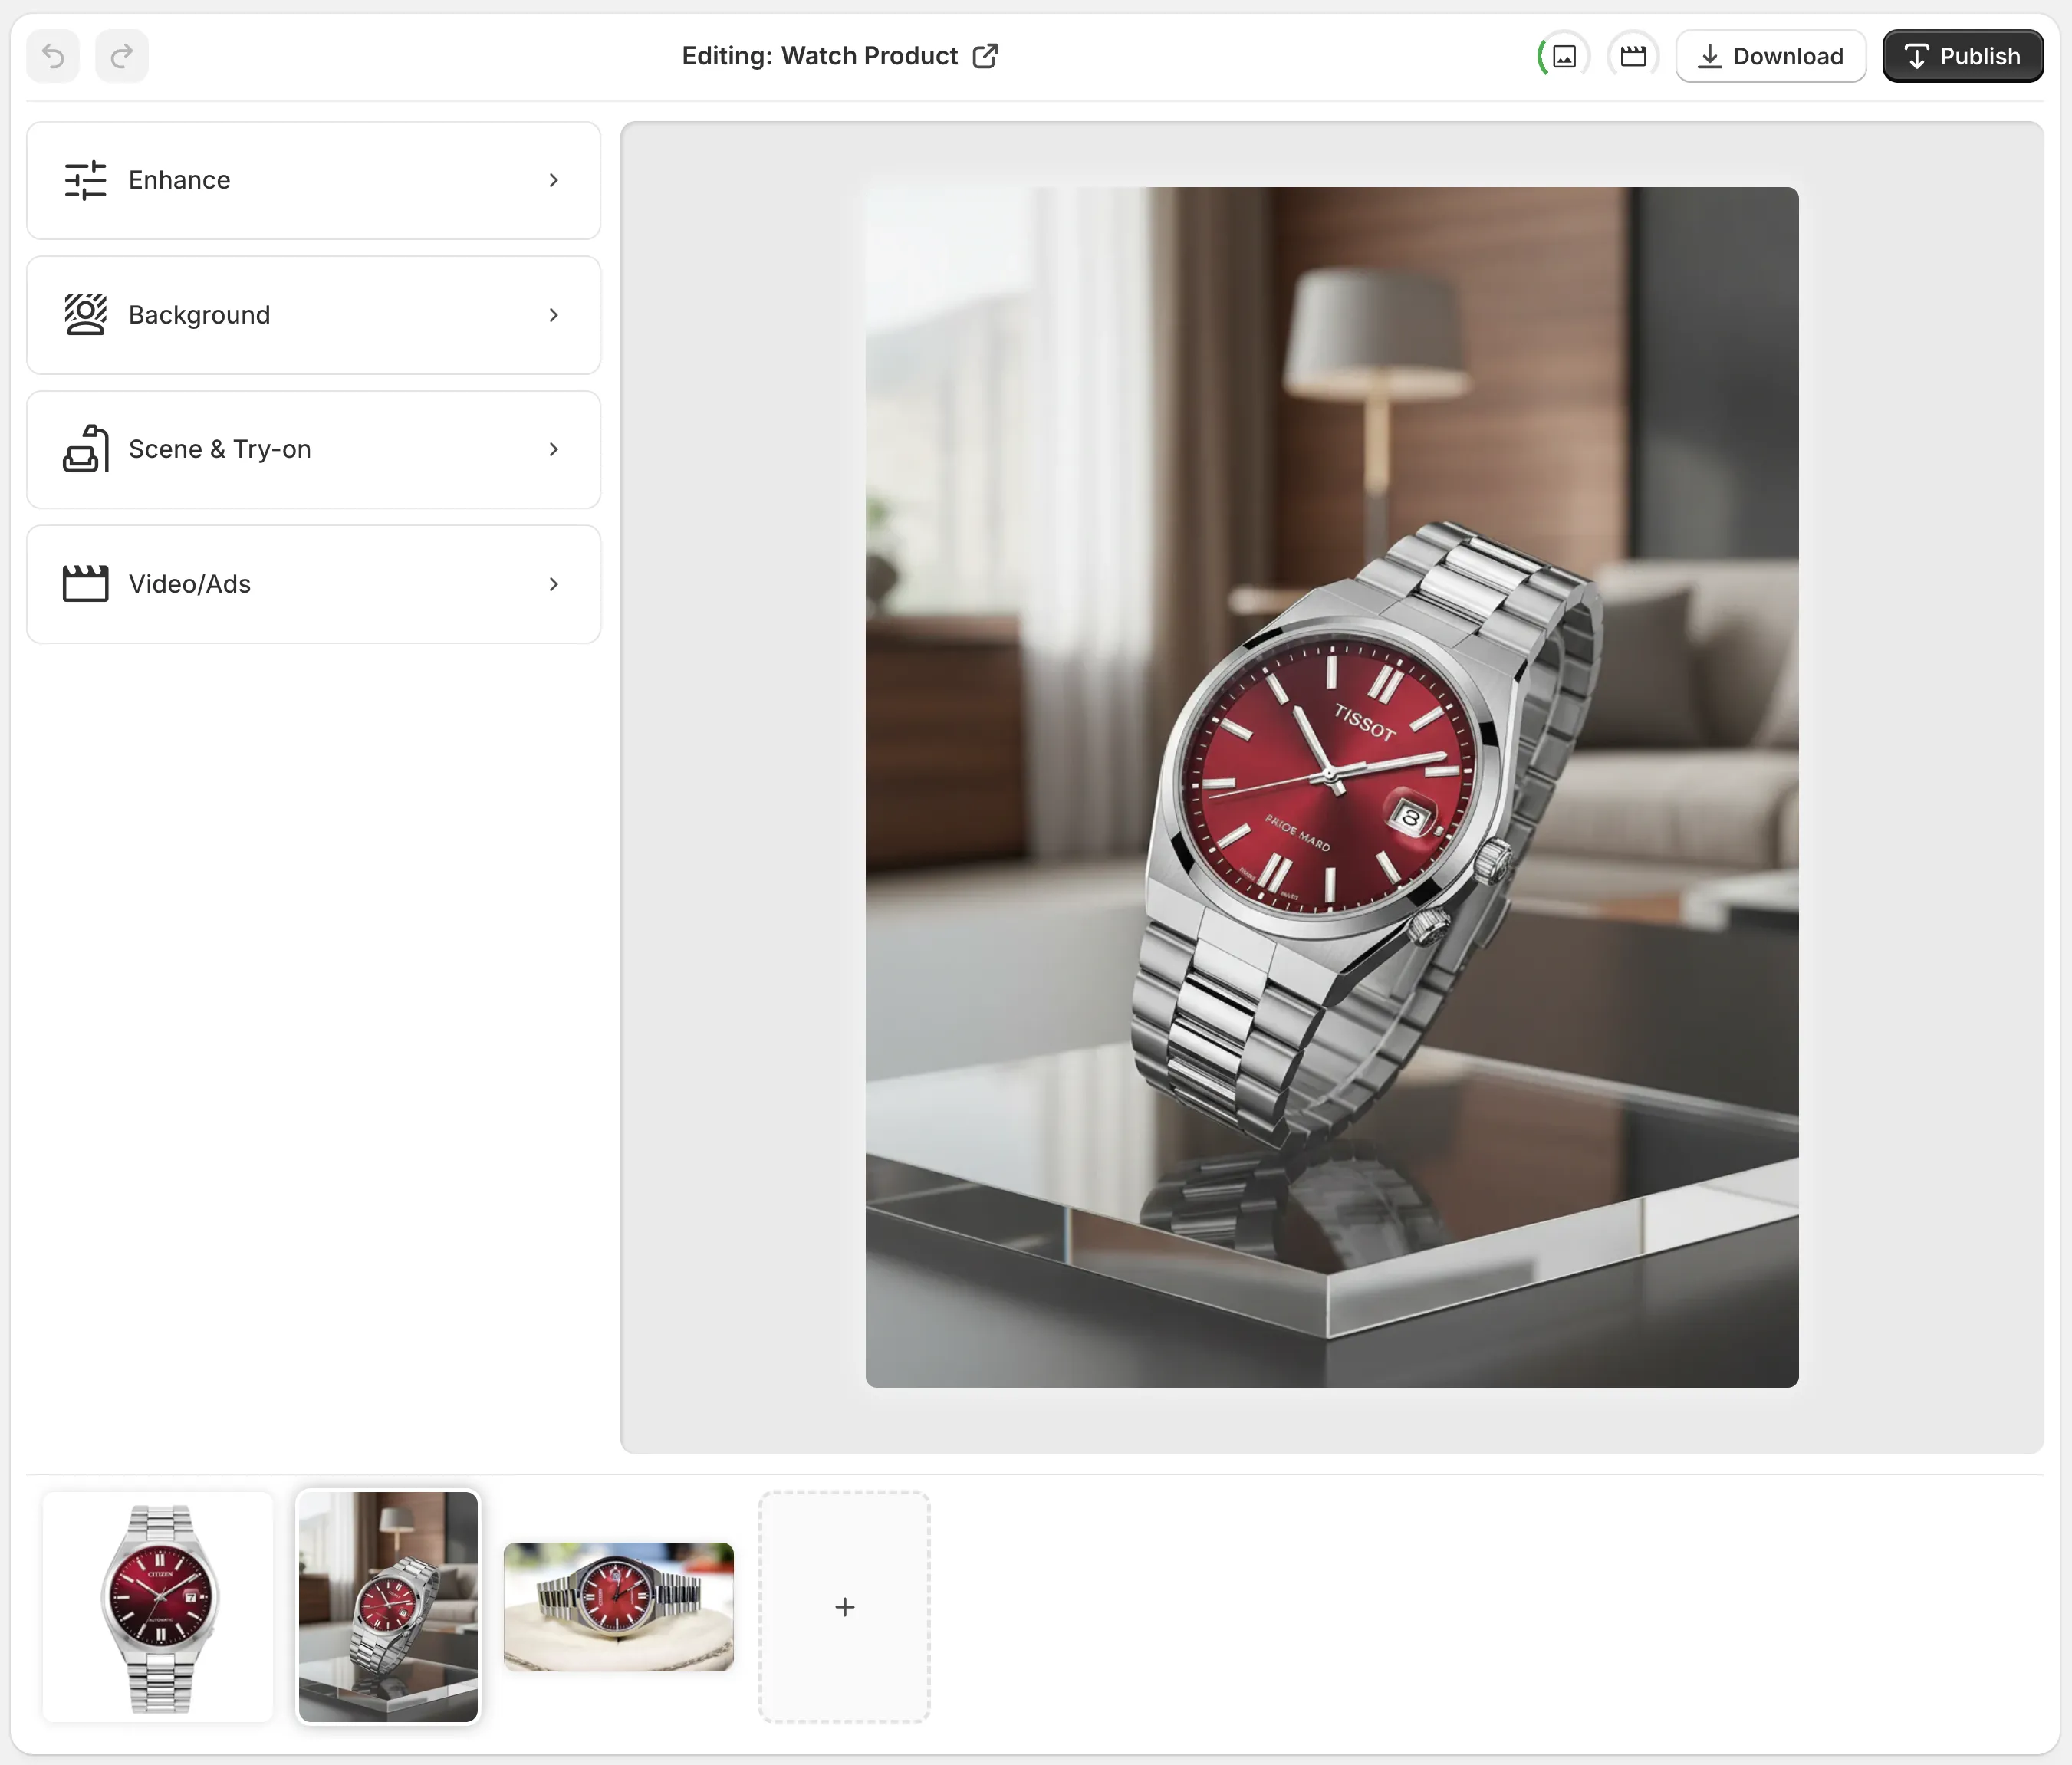
Post-production on a budget: let AI do the heavy lifting
Manual retouching is slow. Instead, keep your capture clean and let AI do the repetitive work.
- Background remover and replace: Instantly clean white or brand-colored backdrops.
- Upscaling: Sharpen and resize to 2000–3000px for crisp zoom on product pages.
- Auto-enhance: Fix lighting, color cast, and mild motion blur.
- Lifestyle placement: Drop products into realistic environments in minutes.
- UGC and B-roll: Produce short, scroll-stopping clips for ads and social.
Supra AI Photo Studio is purpose-built for Shopify merchants. There’s even a free plan to try core features. Install here: https://apps.shopify.com/supra-ai-photo-studio

Step-by-step: turn a plain shot into a high-converting gallery
1) Capture your hero on a white sweep using the setups above. 2) Upload to Supra AI Photo Studio (from your Shopify admin after installing: https://apps.shopify.com/supra-ai-photo-studio). 3) Use Background Removal, then Auto Enhance for exposure/contrast. 4) Apply Upscale to hit 2000–3000px on the longest side (better zoom = higher trust). 5) Generate a lifestyle scene with Object Placement: choose environment (kitchen, office, boutique), surface type, camera angle, and lighting style. 6) Export and publish to your product media from inside the editor.
Fashion stores: realistic try-on without a photoshoot
If apparel is your niche, model photography is usually the biggest cost. AI try-on lets you:
- Put garments on realistic models in seconds
- Change pose, skin tone, and body type for inclusive catalogs
- Maintain product-true fabric, color, and fit
Open Supra AI Photo Studio, select AI Try-On, pick or create a model, and apply your product. No booking, no studio days, no retouching backlog. Learn more on the landing page: https://supra-ai-photo-studio.sktch.io/
Video that boosts AOV and ROAS
Short motion clips lift engagement and ad performance. Use:
- B-roll: cinematic product drops, smooth rotations, or macro passes
- UGC-style videos: influencer-like reviews for TikTok/Reels
Generate these in minutes with the app’s UGC Video Generator and B-Roll AI. See the quick trailer: https://www.youtube.com/watch?v=M2ISy20la78

Optimize for Shopify SEO and UX
- Image size: 2000–3000px longest side for crisp zoom; compress for fast load
- Format: JPG for photos, PNG/WebP for transparency or UI-like graphics
- Filenames: use descriptive, keyword-rich names (e.g., ceramic-mug-matte-black-12oz-hero.jpg)
- Alt text: describe the product and variant (e.g., "Matte black 12oz ceramic mug with ergonomic handle")
- Order: start with clean white hero, then 3/4, detail, lifestyle, in-use, video
- Consistency: same background brightness and angle across a collection
Common mistakes that lower conversions
- Harsh reflections or blown highlights on glossy items
- Inconsistent white balance between images
- Busy or wrinkled backgrounds breaking brand polish
- Crops too tight to the edges (no room for zoom/pan)
- Missing scale/context shots that answer size questions
Your budget-friendly, repeatable workflow
1) Plan your shot list (7–10 images per product). 2) Use a simple window or two-light setup with diffusion. 3) Capture clean, consistent angles; bracket exposure. 4) Enhance, clean, and scale with Supra AI Photo Studio. 5) Add 1–2 lifestyle scenes and a 10–20s video to lift engagement.
If you’re ready to level up your images without hiring a studio, try Supra AI Photo Studio for free: https://apps.shopify.com/supra-ai-photo-studio — or explore features on the landing page: https://supra-ai-photo-studio.sktch.io/
Bonus: Lifestyle idea prompts you can reuse
- Home office: soft morning light, wooden desk, laptop nearby, subtle plant bokeh
- Boutique shelf: warm directional light, marble surface, gold accents
- Outdoor café: late-afternoon glow, textured table, blurred pedestrians
- Bath & body: steamy atmosphere, tiled background, water droplets
Drop your product into any of these scenes with the Object Placement tool in Supra AI Photo Studio, then adjust angle and lighting to match your brand.
Comments
Post a Comment