If you’ve ever tried to export a Webflow project and discovered broken layouts, missing fonts, or glitchy interactions, you’re not alone. Exporting CMS content to clean, static HTML while preserving styles requires more than a simple download—it’s about capturing the exact CSS, JS, images, and structure your site needs to look identical after hosting elsewhere.
In this guide, you’ll learn a proven workflow to export Webflow CMS to HTML without breaking styles. We’ll compare manual and automated methods, then walk through a bulletproof process using ExFlow—a Webflow exporter and downloader that captures CMS content, JS/CSS, images, and even handles syncing or hosting for you.
Why Styles Break When Exporting CMS Content
Common pitfalls that cause layout shifts and broken visuals:
- Missing or incorrect CSS order: Key Webflow-generated stylesheets or custom CSS aren’t included or load in the wrong order.
- JS dependencies not loaded: Interactions and components rely on Webflow’s JS; skipping or deferring them incorrectly breaks animations and toggles.
- Relative vs absolute paths: Assets pointing to CDN or editor paths don’t resolve once self-hosted.
- Fonts not hosted or preloaded: Custom fonts and icon sets can cause FOUT (flash of unstyled text) or missing icons.
- Incomplete CMS export: Native export omits CMS items, leaving templates with empty content.
Two Paths to Export Webflow CMS to HTML
1) Manual approach (advanced):
- Export static pages from Webflow, then recreate or scrape CMS pages manually.
- Gather all stylesheets, scripts, and images; rewrite paths; ensure font delivery; and replicate CMS routes.
- Pros: Full control. Cons: Time-consuming, error-prone, and easy to break styles.
2) Automated approach with ExFlow (recommended):
- Use ExFlow to download your entire site as static HTML, including CMS pages, CSS, JS, and images—then host anywhere.
- Pros: Preserves styling and interactions, removes badges, supports syncing/hosting. Cons: Requires setup (and credentials if you enable sync features).
The Fastest Method: Use ExFlow (Webflow Exporter & Downloader)
ExFlow is built to export Webflow CMS to HTML without breaking styles. It also supports Squarespace and Framer, making it a solid Webflow alternative for self-hosted, static sites.
Key benefits:
- Full CMS to HTML export: Capture all CMS items that native export omits.
- Preserved styles and interactions: Includes CSS/JS/assets, maintaining your visual fidelity.
- Badge removal: Optionally remove the “Made with” badge.
- Automatic syncing: Push to S3, Git, or FTP. You can also host directly on ExFlow.
- Flexible plans: Free to start with paid tiers for higher limits.
Start here: ExFlow Webflow Exporter — https://exflow.site
Step-by-Step: Export CMS to Static HTML with Styles Intact
1) Enter your site URL
- Go to https://exflow.site
- Paste your live domain or staging URL.
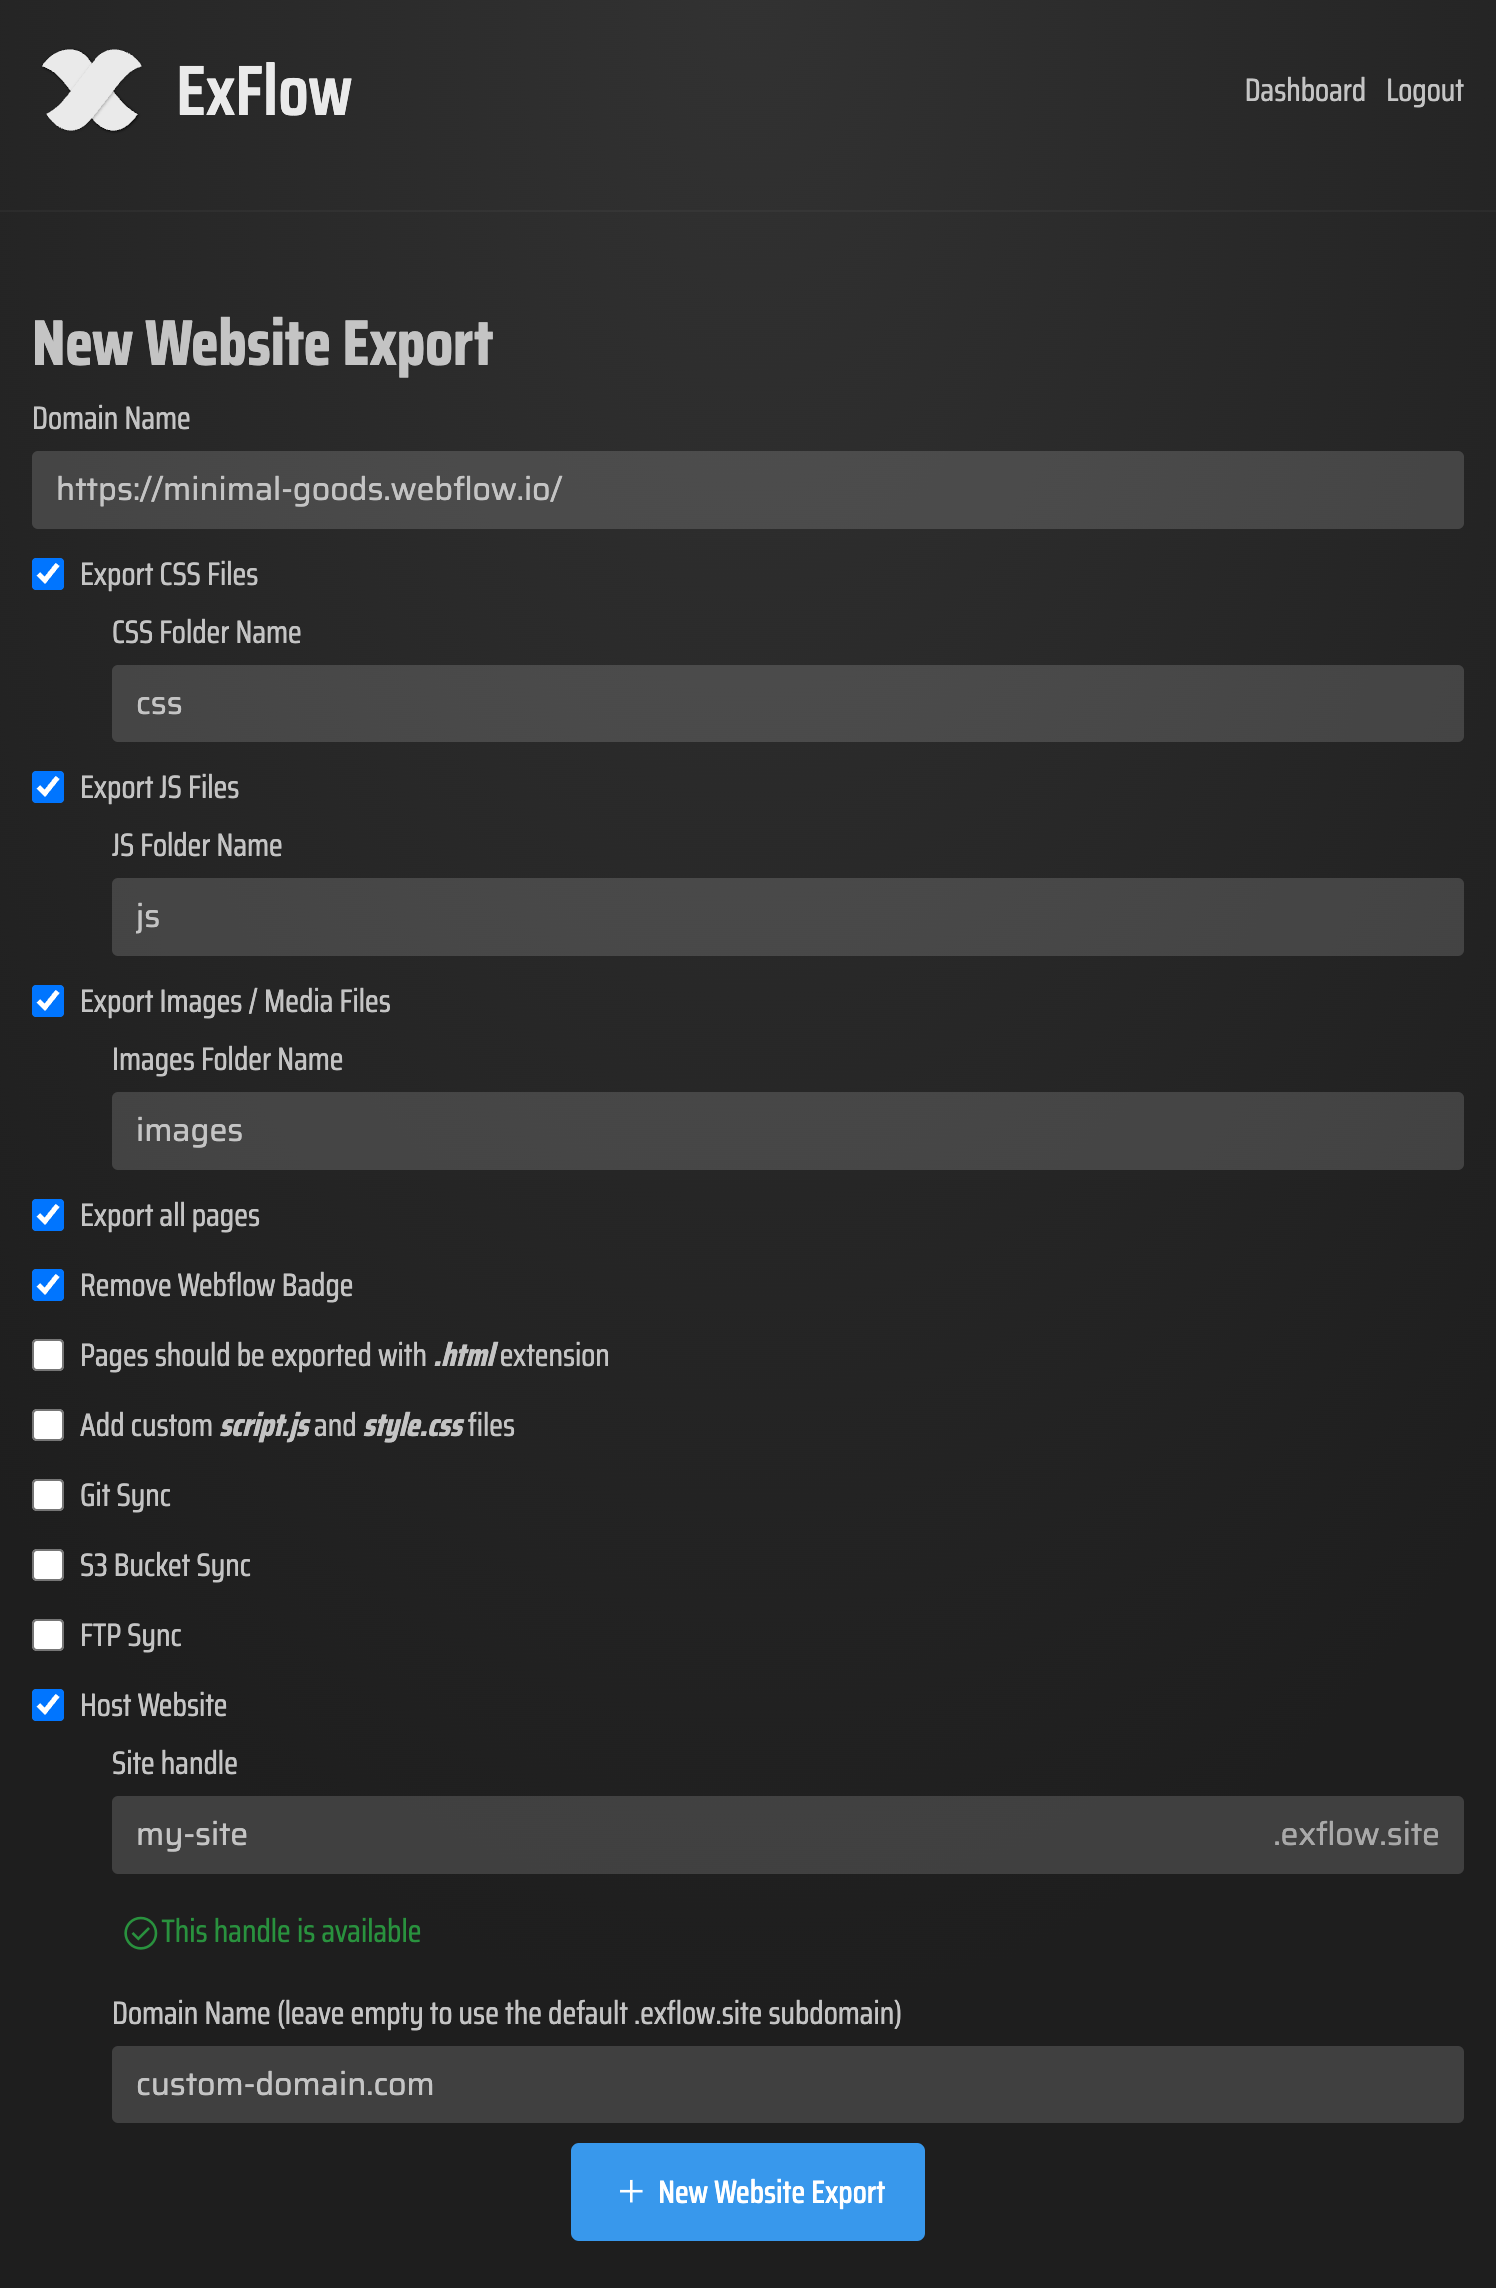
2) Configure export settings
- Enable: Export CSS Files, Export JS Files, Export Images/Media Files, Export All Pages.
- Optional: Remove badge, add custom style.css/script.js, and choose .html extension for pages.
- If you want automatic deployment, set up Sync Git, Sync S3, or Sync FTP (only if you trust the environment—you’ll provide credentials).
3) Run the export
- ExFlow crawls your site, collects HTML for CMS pages, gathers CSS/JS, and rewrites asset paths for a clean static bundle.
4) Download or auto-sync
- Download the ZIP and upload to your hosting, or let ExFlow push it via S3/Git/FTP. You can also enable Hosting on ExFlow and attach a custom domain.
Preserve Styles: The Essential Checklist
Follow this post-export checklist to ensure perfect parity with your original site.
1) CSS integrity
- Confirm all stylesheet files exist (global, components, utility classes, and any custom CSS). Keep the original order in the head tag.
- If you added a custom style.css in ExFlow, place it after vendor styles so it can override safely.
2) JavaScript & interactions
- Verify the main site scripts are included and not blocked by CSP, ad blockers, or 3rd-party script restrictions.
- Keep the original load order for vendor and initialization scripts to avoid broken animations.
3) Asset paths & images
- Ensure image/video paths are relative and point to your static hosting (avoid editor or CDN-only paths that require authentication).
- Preserve srcset and sizes attributes for responsive images; do not strip them during optimization.
4) Fonts & icons
- Host custom fonts alongside your site or use a reliable CDN. Preload key font files to reduce FOUT.
- If using icon fonts or SVG sprites, confirm their URLs and CORS headers.
5) Meta and base URL
- Avoid a conflicting
tag unless you understand the implications for relative paths. - Update canonical, OG, and Twitter meta if the domain changed.
6) Caching and performance
- Serve with far-future cache headers and use content hashing when possible.
- Consider HTTP/2 or HTTP/3 hosting for parallel asset delivery.
7) Accessibility and SEO sanity checks
- Check headings, alt text, and structured data still render.
- Verify robots.txt and sitemap.xml on your new host.

Hosting Options After Export
- Host on ExFlow: The simplest path—flip on Hosting, link your custom domain, and enjoy unlimited bandwidth on ExFlow-managed infrastructure.
- Amazon S3 (static): Use ExFlow’s S3 Sync for one-click deploys, enable static hosting, set index.html.
- Git-based: Sync to a repo and deploy via GitHub Pages or Netlify.
- Traditional servers: Use FTP Sync to push files to your server.
Learn more or try it now: https://exflow.site
Troubleshooting: Fixes for Common Style Breaks
- Flash of unstyled text (FOUT): Preload critical fonts, ensure proper font-display strategy, and confirm font files are accessible.
- Interactions not firing: Confirm the core JS files are present and executed; avoid deferring critical initialization scripts.
- Broken backgrounds or icons: Check relative paths, rename files with safe characters, and ensure MIME types are correct on your host.
- Layout shifts: Confirm the correct CSS cascade order and avoid removing normalization/global CSS.
Video Guides Worth Watching
- Export a Webflow Site for Free + Badge Removal (Webflow-Exporter): https://www.youtube.com/watch?v=38hVzKheSvs
- How to Export CMS Pages on Webflow for FREE: https://www.youtube.com/watch?v=USu9ktYjFDU
- How to Sync Webflow with GitHub: https://www.youtube.com/watch?v=Zvw0qiUKBYk
Why Go Static? Cost, Control, Speed
- Cost savings: If Webflow hosting feels too expensive for your needs, exporting to a static site and self-hosting can dramatically reduce monthly costs.
- Control & flexibility: Integrate with your stack, version control with Git, or deploy globally via object storage.
- Reliability & speed: Static hosting is fast, CDN-friendly, and resilient.
Final Thoughts
Exporting Webflow CMS to HTML without breaking styles is absolutely achievable. Do it manually if you love full control—or save time with ExFlow, which handles CMS pages, CSS/JS, images, path rewrites, syncing, and even hosting.
Get started with ExFlow (Webflow Exporter & Downloader): https://exflow.site
Security note: If you enable Git/S3/FTP syncing, you’ll provide credentials—store and manage them responsibly. Always ensure you have the right to export and host your site content in line with platform terms.
Comments
Post a Comment