If you love designing with Webflow but want faster load times, lower hosting costs, and total control over deployment, converting your Webflow CMS to HTML for static hosting is a smart move. In this guide, you’ll learn a reliable, SEO-friendly workflow to turn dynamic CMS pages into static HTML you can host anywhere — without sacrificing design fidelity.
Along the way we’ll use ExFlow — a purpose-built Webflow Exporter and Webflow Downloader — to export every page, asset, and CMS item in one go. ExFlow makes it easy to Download Webflow CMS content and go from Webflow to Static, whether you prefer S3, Git-based hosts, traditional FTP, or built-in hosting.

Why convert Webflow CMS to HTML?
- Speed and reliability: Static HTML loads blazingly fast and reduces points of failure.
- Cost control: If Webflow hosting feels too expensive for your needs, self-hosting a static site can be far more affordable.
- Portability: Deploy anywhere — S3, GitHub Pages, Netlify, Vercel, traditional cPanel/FTP, or even ExFlow’s built-in hosting.
- Security: No runtime CMS layer means a smaller attack surface.
What makes this tricky: the native Webflow exporter doesn’t include CMS content by default, leaving collection pages and dynamic lists behind. That’s where a dedicated Webflow CMS to HTML converter like ExFlow comes in.
Quick overview: the Webflow to Static workflow
1) Crawl and export everything (including CMS): Use ExFlow to capture all pages, CSS, JS, images, and CMS collections. 2) Verify fidelity: Open the export locally, click through CMS pages, and test interactivity. 3) Host reliably: Push to your preferred hosting via Git, S3, FTP, or ExFlow Hosting. 4) Maintain updates: When content changes in Webflow, re-export and redeploy in minutes.
The easiest way: export with ExFlow (Webflow Exporter)
ExFlow.site is a specialized Webflow Exporter / Webflow Downloader designed to export full sites — including CMS pages — as clean static HTML. It also supports Squarespace and Framer, but its strength shines as a Webflow CMS to HTML solution.
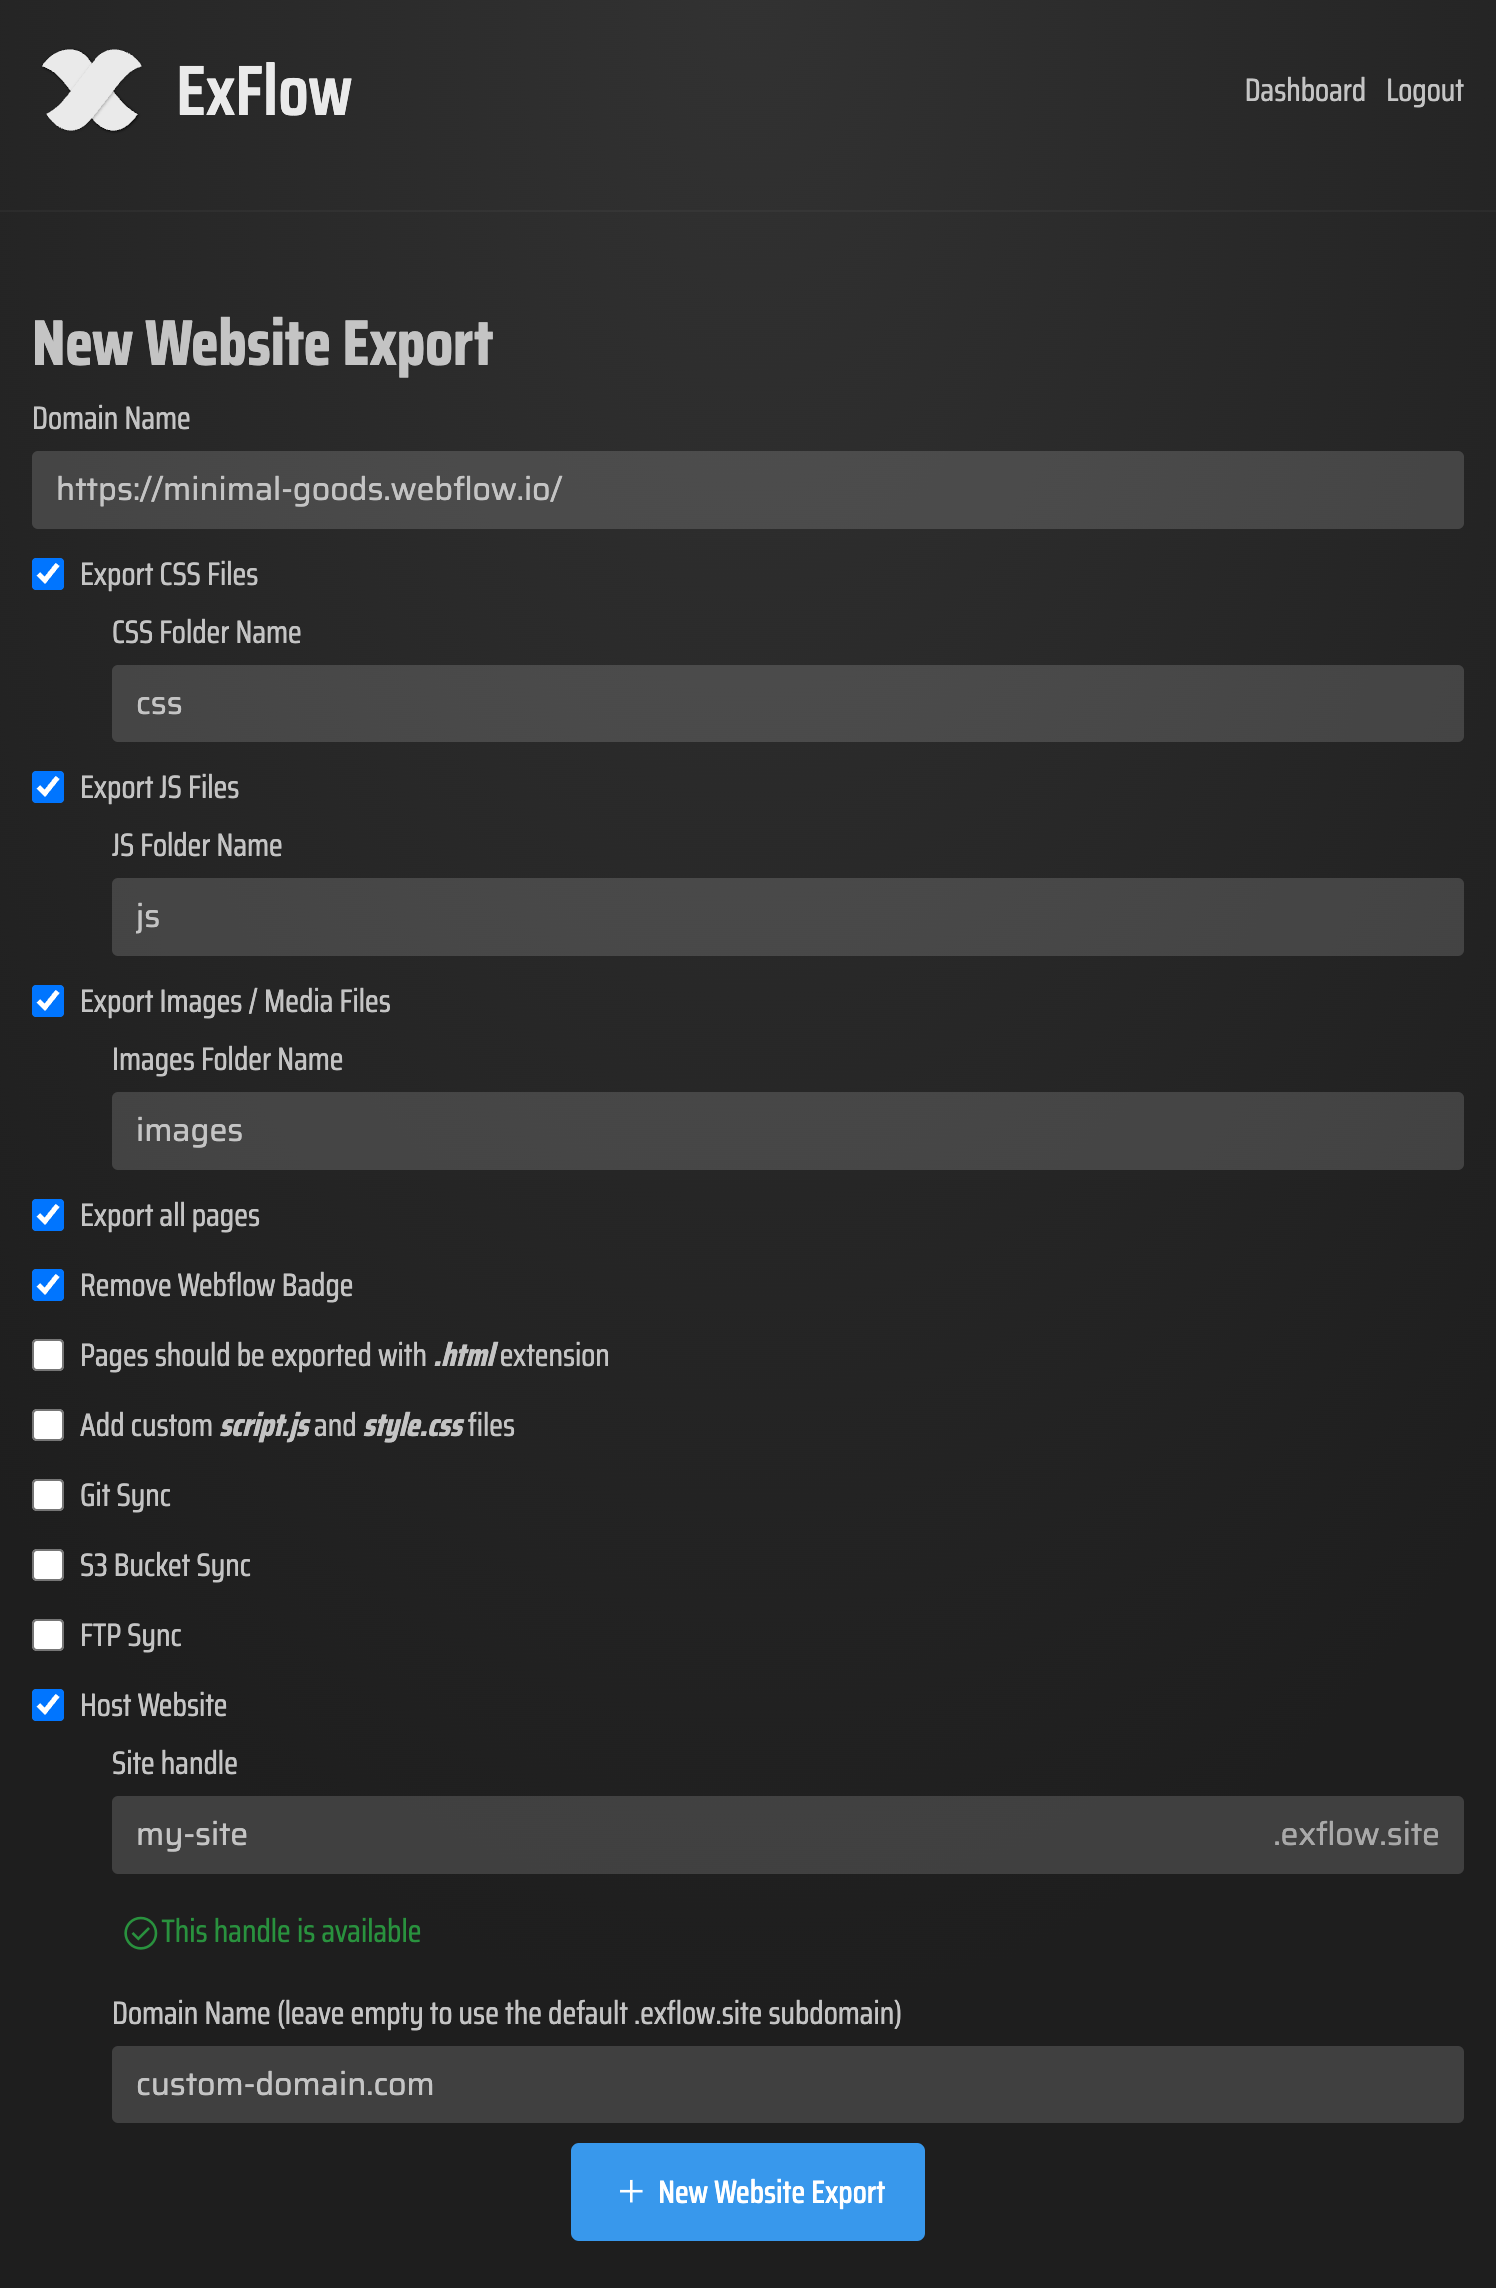
Key capabilities you can toggle:
- Export CSS, JS, images, and media files
- Export All Pages (including CMS pages and pagination)
- Remove the “Made with” badge
- Ensure pages are saved with .html extensions
- Add custom script.js and style.css files
- Automatic sync to Git, S3, or FTP
- Built-in static hosting with unlimited bandwidth and custom domain support
Tip: If you plan to auto-deploy, you’ll provide sensitive credentials for Git/S3/FTP. Store and manage these carefully.
Step-by-step: Convert Webflow CMS to static HTML with ExFlow
1) Prep your site for export
- Audit dynamic features: note CMS collections, filters, pagination, search, and forms.
- Finalize URLs and slugs: consistent URLs make redirects and SEO simpler later.
- Publish to a live or staging domain you control; ExFlow exports from a URL.
2) Run your export
- Go to ExFlow.site and enter your site’s URL.
- Select options: Export All Pages, CSS/JS/Images, Remove badge, and add custom script/style files if needed.
- Optional: Connect Git, S3, or FTP to push the build directly to your host. Or choose ExFlow Hosting for one-click deploys and custom domain linking.
3) Download and inspect
- Grab the ZIP or review the synced repo/bucket.
- Open index.html locally and click through key templates: Collection pages, category/tag lists, and paginated views.
- Confirm assets load correctly and links resolve to .html pages.
4) Host your static site
- ExFlow Hosting: Fastest path — deploy directly and point your domain. Unlimited bandwidth included.
- S3 + CDN: Use ExFlow’s S3 Sync to publish, then attach CloudFront.
- Git-based: Push to GitHub and deploy via GitHub Pages, Netlify, or Vercel.
- Traditional servers: Use FTP Sync to publish to cPanel or a VPS.
5) Schedule your re-exports
- Any time you update content in Webflow, re-run ExFlow and redeploy. With Git/S3/FTP Sync connected, this becomes a quick, repeatable workflow.
Watch it in action
- How to Export CMS Pages on Webflow for FREE: https://www.youtube.com/watch?v=USu9ktYjFDU
- Export a Webflow Site for Free + Badge Removal: https://www.youtube.com/watch?v=38hVzKheSvs
Handling common dynamic features after the export
- Forms: Static HTML can’t process forms natively. Options:
- Use a static form backend (Formspree, Basin, Netlify Forms, serverless functions).
- In ExFlow, include a custom script.js that submits via fetch() to your chosen endpoint.
- Search: Use client-side search (e.g., prebuilt JSON index + Lunr/elasticlunr) or a hosted search service. Include the index in your export and wire it up with custom JS.
- 301 redirects: Configure in your hosting platform (e.g., _redirects file for Netlify, routing rules for S3/CloudFront, or server rules on Apache/Nginx).
- Analytics and pixels: Add tracking code via the custom script option so your static build still reports accurately.
SEO checklist for Webflow CMS to HTML migrations
- Preserve URLs: Keep identical slugs where possible to avoid ranking losses.
- Canonicals: Ensure each page outputs a proper rel=canonical.
- Sitemap and robots: Include sitemap.xml and a robots.txt that doesn’t block important sections.
- Meta tags and Open Graph: Verify they’re present post-export.
- Performance: Compress images, defer non-critical JS, preconnect to CDNs.
- 404/500 pages: Include clean fallbacks to maintain user experience.
When is a static Webflow Alternative the right call?
- Your content cadence is predictable and doesn’t need real-time editing.
- You want full control over hosting and CI/CD.
- You need to cut recurring costs (Webflow too expensive for your use case) without losing your pixel-perfect design.
If this sounds like you, a Webflow to Static setup via a dedicated Webflow Exporter is ideal.
Why ExFlow?
- Purpose-built Webflow Exporter: It reliably captures CMS pages that the default exporter misses.
- End-to-end workflow: Export, host, and sync via Git/S3/FTP — all from one place.
- Badge removal and file hygiene: Clean, production-ready .html, CSS, JS, and media.
- Flexible plans: Start quickly and scale with higher limits when you need them.
Get started now
- Try the ExFlow Webflow Exporter: https://exflow.site
- Download Webflow CMS as HTML and self-host anywhere in minutes.
- Prefer one-click? Use ExFlow Hosting and link your custom domain.
For a deeper walkthrough of exporting CMS pages and deploying, start here: ExFlow.site
Pro tips and gotchas
- CMS updates aren’t “live”: Static builds don’t auto-sync. Re-export when content changes.
- Third-party embeds: Verify scripts and iframes work without authenticated sessions.
- Access-controlled pages: You’ll need appropriate access to export private areas. Only export content you own or are authorized to use.
- Testing: Click through pagination, filter states, and collection variations before going live.
Conclusion
Converting Webflow CMS to HTML for static hosting gives you speed, control, and cost savings — without compromising on design. With ExFlow.site, you have a dependable Webflow CMS to HTML pipeline: export every page (including CMS), clean up assets, and deploy to your preferred host or ExFlow’s own platform. Build once, host anywhere — and take full control of your site’s performance and budget.
Comments
Post a Comment