If you love designing in Webflow but need the freedom and savings of self‑hosting, you’re not alone. Many creators hit the same pain points: Webflow too expensive for simple sites, no native CMS export, or needing tighter control over performance and security. The good news: you can Download Webflow CMS to HTML, turn Webflow to Static, and safely host it yourself—without losing your design fidelity.
In this guide, you’ll learn a secure and repeatable workflow using ExFlow, a powerful Webflow Exporter and Webflow Downloader that captures all pages (including CMS), assets, and interactions—then syncs them to hosting via Git, S3, or FTP. You’ll also get a checklist to harden credentials and protect your deployment.
What you’ll achieve
- Download Webflow CMS to HTML (including CSS, JS, and images)
- Remove badges, add custom scripts/styles, and keep animations intact
- Self-Host Webflow Site on your stack (GitHub Pages/Netlify, S3, traditional hosting, or ExFlow hosting)
- Follow a practical security checklist for safe credentials and deployments

Why export and self-host your Webflow site?
- Cost savings: For many small sites, static hosting is far cheaper than premium hosting tiers. A pragmatic Webflow Alternative is exporting and hosting elsewhere.
- Control: Serve from your preferred CDN, set caching rules, and integrate with dev workflows.
- Performance: Lean static delivery can improve Core Web Vitals, SEO, and reliability.
Meet ExFlow: a dedicated Webflow Exporter/Downloader
ExFlow.site is purpose-built to export Webflow, Squarespace, and Framer sites to static, downloadable packages. It can:
- Export all pages (including CMS), CSS, JS, images/media
- Remove the “Made with” badge
- Add custom script.js and style.css
- Sync to Git, S3, or FTP automatically
- Offer built-in hosting with unlimited bandwidth and custom domain linking (plan-dependent)
Tip: ExFlow is more resilient than traditional scrapers (like HTTrack) for modern, interactive sites—animations and dynamic content are preserved more reliably.
Is it legal and safe to export your content?
- Own or have rights to the content. Respect Webflow’s Terms and any third-party licenses.
- If you export client projects, ensure your contract permits it.
- If a site is password-protected, only export with the owner’s permission. Note: ExFlow can access password-protected Squarespace sites when the owner provides the password.
Step-by-step: Download Webflow CMS to HTML with ExFlow
1) Visit ExFlow
- Go to ExFlow.site. Click Start and paste your site URL.
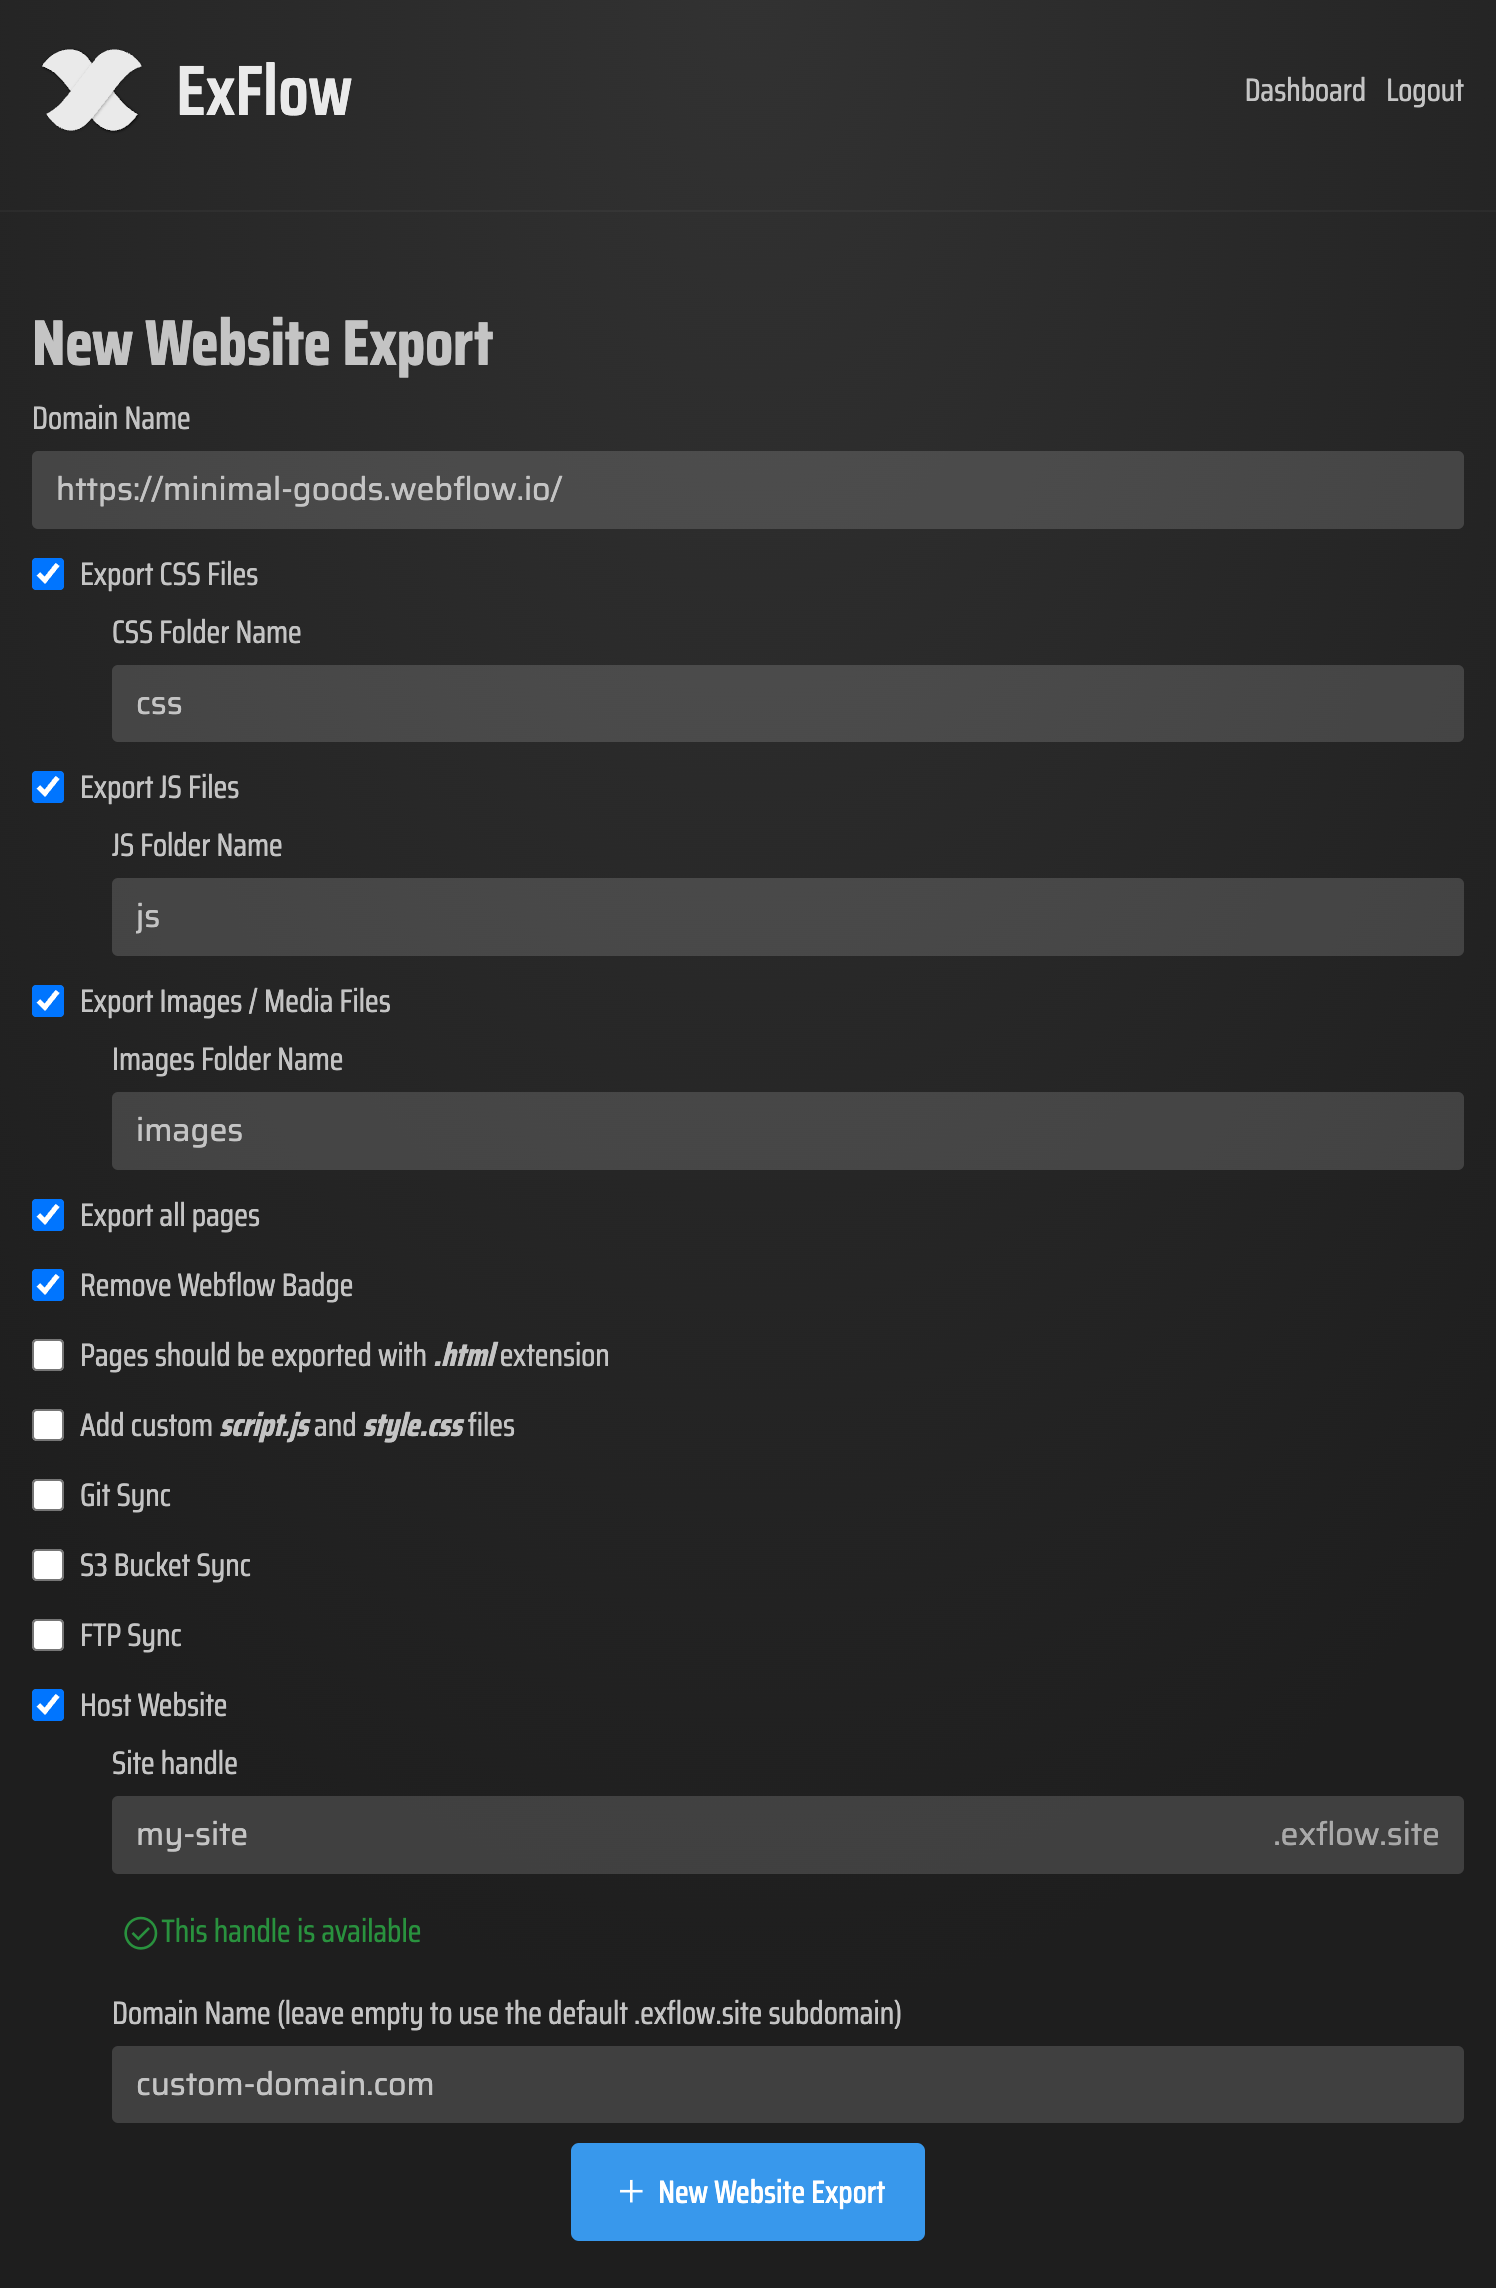
2) Configure your export
- Toggle what you need: Export CSS Files, Export JS Files, Export Images/Media Files.
- Select Export All Pages to ensure CMS pages are included.
- Optional: Remove “Made with” badge.
- Optional: Add custom script.js and style.css to bundle your tweaks.
3) Choose delivery
- Download a zip: Perfect for manual uploads.
- Or sync automatically to Git, S3, or FTP (details below).
4) Run the export
- ExFlow will crawl and package your site, including CMS pages that Webflow’s native exporter omits.
5) Verify locally
- Unzip and open index.html. Check menus, interactions, images, and forms.
Security first: how to handle credentials safely
When using Sync Git / Sync S3 / Sync FTP in ExFlow, you’ll enter sensitive credentials. Follow this checklist:
- Principle of least privilege: Use tokens/keys that only permit the needed actions (e.g., write-only to a specific bucket or repo).
- Use temporary keys if possible: Prefer short-lived tokens over permanent ones.
- Restrict by IP or VPC where supported: Allow-list trusted IPs for S3 or Git providers.
- Encrypt at rest: Store secrets in a password manager; never hardcode in code repos.
- Two-factor authentication: Enable 2FA on your Git and cloud accounts.
- Rotate regularly: Revoke and regenerate tokens/keys on a schedule or after team changes.
- Separate staging from production: Different credentials for each environment.
- Audit logs: Review provider logs for unusual access.
Safe self-hosting options (with checklists)
You can host the exported static site almost anywhere. Here are four secure options:
1) Host on ExFlow
- Easiest path: During export, choose hosting on ExFlow’s servers. Plans support custom domains and unlimited bandwidth.
- Safety checklist: Add HTTPS, strong DNS provider, and enable HSTS. Keep a local backup zip.
2) Host on Amazon S3 (static site)
- In S3, create a unique bucket (e.g., example-com-site). Enable static site hosting.
- Use ExFlow’s S3 sync to push exports directly.
- Safety checklist: Apply least-privilege IAM policy for the Access Key; enable versioning; serve via CloudFront with HTTPS; set Cache-Control headers.
3) Host via Git (GitHub Pages/Netlify/Vercel)
- Connect your Git repo in ExFlow and push the export.
- Deploy via GitHub Pages or hook Netlify to auto-deploy from main.
- Safety checklist: Use a PAT with repo-only scope; enable branch protections and required reviews; set environment variables for build secrets; enable HTTPS and redirects.
4) Host on traditional servers via FTP
- Provide FTP/FTPS/SFTP credentials in ExFlow to auto-upload.
- Safety checklist: Prefer SFTP or FTPS; restrict to the web root; disable anonymous access; set correct file permissions (e.g., 644 files, 755 directories).
Static site considerations (forms, search, and CMS logic)
- Forms: Static HTML won’t process forms server-side. Use static-friendly form handlers (serverless functions or services). Update form action endpoints in your exported HTML if needed.
- Search: Implement a client-side search (e.g., prebuilt JSON index) or a hosted search service.
- Membership/auth: Static exports won’t replicate authenticated areas. Consider headless auth + serverless or keep those areas on the original platform.
- Scheduled content: Since it’s static, schedule redeploys for new CMS content (ExFlow supports recurring exports via sync workflows).
Performance and SEO polish
- Caching: Set Cache-Control headers (e.g., long TTL for assets, shorter for HTML). Use a CDN.
- Sitemaps & robots: Ensure sitemap.xml and robots.txt are exported and updated. Submit to Search Console.
- Canonicals: Keep canonical tags to avoid duplicate content issues during migration.
- Redirects: Replicate any legacy paths with 301s (via _redirects on Netlify, rules in CloudFront, etc.).
- Accessibility: Recheck alt text, headings, and color contrast after export.
- Core Web Vitals: Leverage HTTP/2, compression (Brotli/Gzip), and image optimization (AVIF/WebP).
Troubleshooting export issues
- Animations not triggering: ExFlow generally preserves interactions. If something looks off, ensure JS is exported and paths are relative. Clear caches.
- Missing images/CSS: Confirm Export Images/Media and Export CSS/JS are enabled, and that the CDN references are reachable after hosting.
- 404s on deep links: Enable clean URLs or HTML fallback rules (e.g., serve /about.html when /about is requested).
- Forms failing: Point forms to a working endpoint; many users add a lightweight serverless handler.
Quick start resources
- Tutorial: How to Export CMS Pages on Webflow for FREE — https://www.youtube.com/watch?v=USu9ktYjFDU
- Webflow Exporter demo (free + badge removal) — https://www.youtube.com/watch?v=38hVzKheSvs
- Sync with GitHub workflows — https://www.youtube.com/watch?v=Zvw0qiUKBYk
Take control of your publishing stack
If you’re bumping into platform limits or hosting costs, using a Webflow Downloader like ExFlow to produce a Webflow CMS to HTML package is a smart, secure move. You’ll cut costs, improve performance, and own your deployment strategy—without sacrificing your design.
Ready to try it? Start your first export at ExFlow.site and ship your Webflow to Static in minutes—then host it safely on ExFlow, S3, Git-powered platforms, or your own server.
Comments
Post a Comment